So my week here in Iida, Nagano has wrapped up. I spent almost five days working with the boatbuilders and then gave the keynote address at the symposium. It all went extremely well and I can say I made many new friends. It was also fascinating to take part in the construction of a river boat and I scrambled to take notes and measurements. The boatbuilder uses no drawings; only patterns.

We managed to get two strakes around the boat in less than a week's time. Now they have just one strake to go and the hull is finished. There's no internal framing except for two horizontal beams installed across the hull at the gunwale. Later the outside of the hull gets fiberglassed and two metal frames are bolted inside the hull to allow the boats to be lifted out of the water with a crane at the end of the downriver trip. They are then trucked back to the starting point.

A look at the scarf joint used to join planks. Each strake, or run of the planking, is made up of three boards scarfed together.

In lieu of angle measurements and plank widths, we used this pattern which contains all that information. The plank widths are marked and we set the plank angles to the pattern.

The boatbuilder here had an interesting process for cutting the mortises for the edge-nails. He was very fast so I wanted to document it. First he makes a relief cut marking the bottom of the mortise.

Then he makes a series of relief cuts marking the side of the mortise. Note the slight curve.
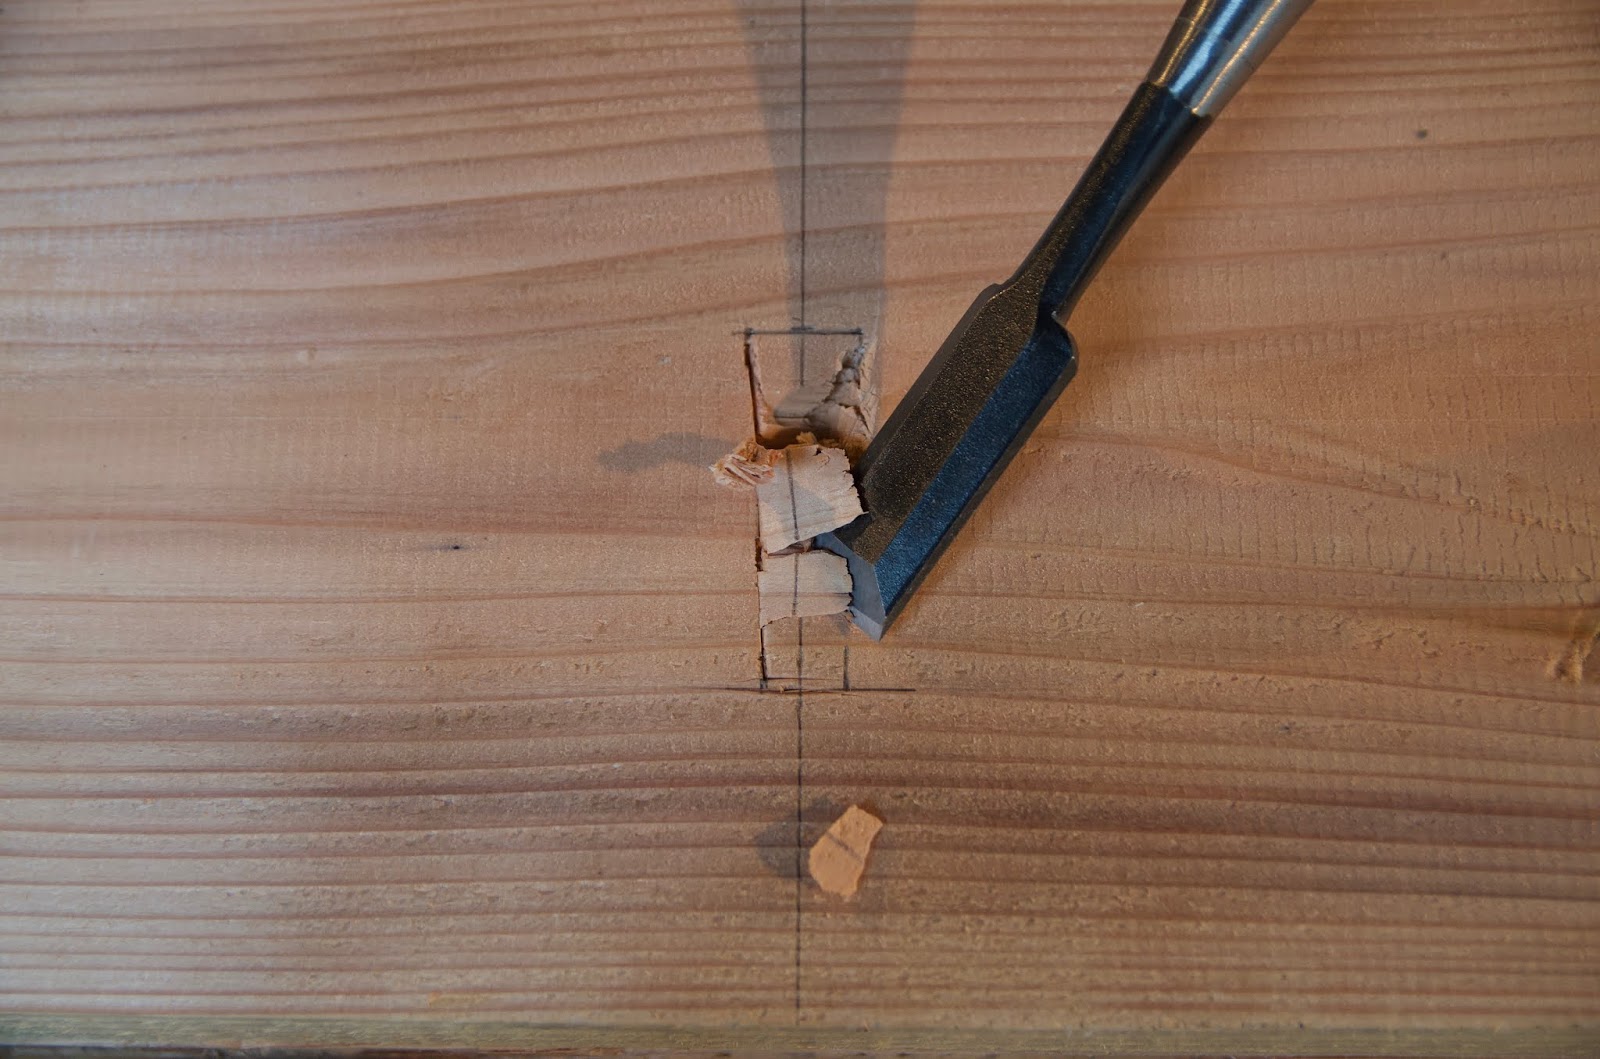
Then, angling the chisel steeply, he cuts the shape of the other side down to the bottom. The material breaks out up to the relief cuts on the other side. He free hands the shape of the right side, though I made a matching set of relief cuts to try and get a symmetrical mortise.

Then he cuts vertically down the left side. The chisel is angled steeply back, away from the camera, and rocked slightly as its struck. By the time the chisel reaches the bottom of the mortise the upper corner of the edge should have plunged to the full depth. The chisel is 8 bu wide (about 7/8") and laid over at 45 degrees it will have cut the proper depth.

The last pass is vertically down the right side, chisel still angled away from the camera.

The finished mortise. When we plunge the tsubanomi from the plank edge to the mortise to make the pilot hole it breaks out the waste in the center at the base of the mortise. We then use a small chisel to clean out the mortise right before nailing. This method is very quick.

My guest house for the week, a restored and converted 200-year old home. The young couple who run the place actually didn't buy it, but rent it for a very small amount. Some people simply can't part with old family homes but will rent them for very little money, knowing that an empty house can quickly succumb to decay. Please see their website: yamairo-gh.com.


The couple who run the guest house are part of a small, but growing phenomenon of young people heading back to the countryside and finding creative ways of making a living. In this case the woman was from Iida, but spent four years working for an architectural firm in Tokyo. After spending a year in Berlin with her husband they were inspired by the guest houses they say there and decided to try and replicate the concept in her home town.

The jackets are for customers to wear while lounging in the common spaces. It is a traditional house, therefore no central heating and no insulation. We had small, portable kerosene heaters, and plenty of quilts on the beds.


The inn has just a few private rooms and mostly dormitory-style accommodations, with each person getting a fully enclosed bunk-type bed. Its a bit like Japan's famous capsule hotels. The rates are less than thirty dollars a night and breakfast is about four dollars. They also do dinners.

Next door is the massive home of a former sake merchant. In the foreground is the kura, or fireproof storehouse. Iida has the biggest kura I have ever seen in Japan.

The day before the symposium we had a holiday so staff could set up for the conference. I took the day and drove two hours west to see my teacher from 2017, Mr. Seichi Nasu. He's finishing up a small boat he's built on speculation, and had another fishing boat he was repairing. I wrote a series of blog posts about that project beginning with this one.

At the symposium Yazawa san, the master boatbuilder, demonstrated his rhythmic nailing technique on the conference stage. I couldn't seem to upload the video to this blog but look for it at my Instagram page.

It was nice to see a brand-new set of nail chisels and a fresh box of new nails. I'd feared all the sources for these materials had all but dried up in Japan, but the folks here found a blacksmith in Sanjyo City, a very famous tool-making town in Niigata Prefecture, that has begun making boat nails and these specialized tools. The nails are about a dollar apiece, and the chisels are over two hundred dollars. They are all hand-made, however.

We had a tour bus visit the shop my last day.

A look at the bow with one plank remaining.

People here have said over and over how the local boatbuilding traditions came from the Kiso and Nagara River valleys to the west, where I worked in 2017. These boats show a definite resemblance to the boat I built there.

The Tenryu river flows due south out of the mountains to the coast and was a vital avenue for trade to and from the interior. The boats would sail back upriver with prevailing winds.

Hello,
ReplyDeleteI was extremely fascinated by your project on building a wooden boat from scratch and I had a few questions to ask you, if that is ok.
First off I should say this inspired me to take on this challenge myself and also to write about this process for my A level Use of Maths Course work. And I hope by you being able to answer some of my questions/ forward me on to a place where I could find them out so I can further my research in the field of building boats. as later in life I would like to become a Marine Engineering or a Naval Architect and it would cement my plans to aspire to my goal.
The first question I would like to ask is roughly how long did each of the steps take to complete the job and overall how long did the job take. This will help me understand and write about the time scale of the job at hand, which is one of the tasks I need to complete. Secondly how many workers did it take to complete the job. Any help will be very valuable. see more
It is a real art to make something from nothing! How smart and creative you are! Your job is much valued!
ReplyDeleteThis is a very interesting event that will help to understand a lot of important points that will open this topic for you differently.
ReplyDeleteUntil you come across what you start to make a boat, many people think that it is very easy and simple and only then do you understand how important your every move is.
ReplyDeleteI can see you have done a great piece of work. I understand your feelings. It is such a reliefe when you finally finish the project. I've been working on the discussion chapter for my dissertation. It took a lot of efforts and energy.
ReplyDelete