Sunday, June 25, 2017

Last Plank Before Vacation

We have two more days of work before we leave for a week in Okinawa. I am finally going to see the annual open ocean sabani race from Zamami Island to the capitol city of Naha. If you go back to the very beginning of this blog you can read about the boat I built with one of Okinawa's last traditional boatbuilders. I will get to finally see that boat in the water.
Here on the cormorant fishing boat, we got the last plank fitted on the hull. The sheer plank has a more complex scarf joint with a step in the middle. Wouldn't you know but I cut the very last one of four slightly off, but in fact its an easy mistake to fix by inserting a pair of wedges in the gap.

In the past my teachers have always wedged this type of joint. Its must faster to make and fit since the pair of wedges makes up the difference. In this case I was about 3/16th of an inch off. Here is the view from outside after we had glued the scarf and clamped the plank on with dogs. 

And the view from inside. As soon as the glue dried I cut the wedges flush.

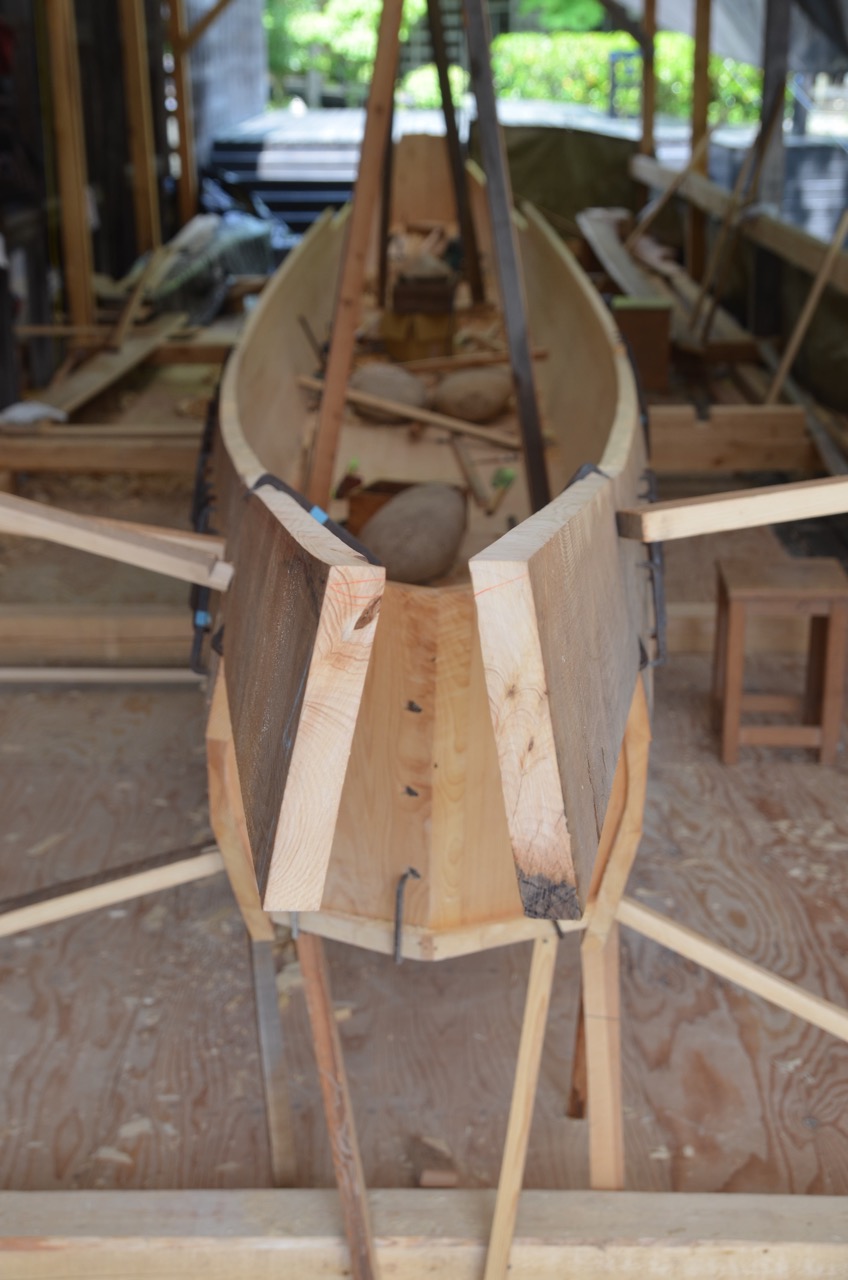
The joint in the sheer strake forward is for a plank extension that will support the forward deck. We did not do this aft, where our planks just ran long as deck supports. I assumed this was done to facilitate repair, because the forward deck supports a heavy davit for the basket carrying the fire used to attract the fish. I asked Nasu san and he said this was perhaps the most fragile part of the boat and one he has repaired often, but in the end he said simply that this was the way his father did it, and that was reason enough.

Nasu san attached a batten and ran a string to a point on the sheer plank and showed us how he would calculate the rise in the extension.

We went to watch cormorant fishing in Seki. Earlier we had watched the six fishermen in the big city of Gifu, by far the most well-known sightseeing spot, but Seki was wonderful: just three fishermen but our tour boat could get very close, and the setting is rural and quiet, far from the city lights.


The fishermen swing the fire basket from side to side, and this is when the strain sometimes breaks the forward plank.

Afterwards the senior fisherman invited us home to his 350-year old house. He is an 18th generation cormorant fisherman (you read that right), the longest such lineage in Japan. 

Thursday, June 22, 2017

Planking the Hull

Time has slipped by plus I had a computer glitch that kept me from posting. The hull is almost completely planked now. I will throw up some photos here with captions.

We made a huge push at the start of this project, propelled by our teacher's insistence we couldn't finish this boat before mid-August (our return flights are the end of July!). Its been long days, six days a week, but we've almost planked the hull. Here you see our second strake nailed on. The cormorant boats have transoms bow and stern.

A section of the third strake, propped in place ready for scribing. We rough cut with a circular saw, then prop the plank in place and run a series of saws through the seam in order to make it fit with the adjacent plank. This is a technique central to Japanese boatbuilding.

Hard to see, but I am making the final pass at the transom with the saw running through the seam. I will try to create a blog post that illustrates that more clearly.

Another shot of the third strake fitted. Then come the edge nails, fastening the plank to the one below. Nailing consumes a huge proportion of our time.

Three strakes on, and this view shows the stone weights our teacher uses to help hold the structure in place, along with four stout props overhead.

Final strake going on...

...and you get an idea of its true shape. These extended planks support decks bow and stern.

The three planks that form each of our top strakes uses a slightly different (and more difficult) scarf joint. The vertical plugs you see fill the mortises of our edge nails.

Now that we are getting closer to doing final finish work on the boat Nasu san took us to Seki City to see their fleet of cormorant boats. He wanted us to see the final product and get a feel for these details.


Thursday, June 8, 2017

Building the Cormorant Boat

Almost to the end of Week Three and our time here consists of boatbuilding and little else. We are working twelve hour days, five days a week, with six to ten hours on Saturday. Okay, I'll stop referencing our heroic suffering, especially since today Nasu san told us during his busy times he worked from 5:30 am to 10 pm. He said he took the normal workman's holidays of just the first and fifteenth of each month.

Last week we finished the bottom of the boat, which Nasu san said represented 1/3rd of the total labor.

The bottom has about 200 edge nails, and one innovation we developed was a pattern for the mortises. Nasu san can cut a hundred mortises by eye and all of them will be nearly exactly the same. We cannot do that, but this jig lets us not only standardize all the mortises (which would greatly help when making plugs), but we also ran a saw and cut the sides of each mortise as well. 

Using the saw gave us a nice clean edge.

I would have next set up a jig to cut identical plugs but Nasu san just sat with scraps and his hatchet and made most of our plugs by eye. Again its astounding what he can do and how consistent his work is. If Malcom Gladwell says you have to do something 10,000 times to become proficient, well Nasu san has built about ten cormorant fishing boats (and hundreds of other boats) and each cormorant boat has a thousand nails. He's proficient.

This stick pattern has the bevels we needed for the bottom.

Nasu san have five stations along the 36-foot long bottom for bevels and plank angles.


We planed both sides of the bottom, first roughing it with a power plane but then final finish with hand planes.

Nasu san uses two sets of stout props as well as stones and an iron weight to fix the bottom for bending and planking.

We got right to planking.

Here Nasu san is showing me how to use the sagefuri, a plumb bob on a stick. He has a mark five sun below the string and every angle of the boat is a horizontal measurement from the string to the mark. In other words, every angle is memorized as the short leg of a right triangle.

Our umbrella nails rusted nicely.

All the nails in the boat are piloted with a tool called a moji. It is a narrow chisel that one strikes, then you swing the handle 3-5 times through 180 degrees and strike again. Its a SLOW process and in my next blog post I will show a small innovation we've made. Surprisingly, Nasu san has not objected to any of our little tricks and patterns, and when I asked him today what sorts of innovations he made versus how his father built boats he said he'd changed nothing. He acknowledged that glue and power tools changed things, but that was it.

We use a kama scarf on the planking. This was the same scarf on the bottom planks. It takes three pieces to make a single strake the length of the boat.

The first two strakes.

Meanwhile the Green Woodworking Club of the furniture school got out their shave horses and started practicing.

And Tobunken, the Tokyo Research Institute for Cultural Properties, one of our partners in this project, took us to see the cormorant fishing in Gifu. Very dramatic and ancient feeling.


Sunday, June 4, 2017

Beginning the Boat

This blog post is late coming, but not for lack of desire. We've quickly settled into our pattern: awake at dawn and then to the building site by 6 am. We get a jump start on the day before Nasu san arrives about 7:30. He supervises us until about 5 pm and we sometimes stay longer just to finish what we are working on at the time. On Saturday Nasu san spends the morning with us and we either quit when he leaves at noon or we keep working the rest of the day.  Its been two weeks now of this schedule and in that time we've managed to finish the bottom of the boat. About two hundred edge nails, with eight hundred to go to finish the sides.

I have had a surprising internet success with the posting of a video of Nasu san's nailing method at my Instagram page. Over 8,000 hits thus far. Check it out here.

We are working with the bottom set up on the vertical, something most Japanese boatbuilders do not do (we briefly did this at one point building the sabani in Okinawa). It meant hard work when were were fitting and nailing the first seams, squatting and working on our knees, but it got much more comfortable toward the end. The bottom consists of seven strakes comprised of nineteen pieces of wood scarfed and edge-nailed together.

Readers are familiar with my describing the fitting of planks using a handsaw. I could give much more detail and will try later, but feeling pressed for time I offer a photo of the fit between planks after sawing.

Once sawn to fit we pound the edges, making a slight concavity. The trick is to NOT touch the corners, so the seam maintains the tight fit. The idea is moisture will expand the compressed fibers tight to one another. First pounding leaves visible hammer marks...

Then you make a second pass with the round-faced hammer to smooth out the marks.

It is not easy negotiating the work site, stepping over and ducking under the forest of props holding the bottom upright.

Nasu san uses a strange stick pattern to set the bevel for the side planking.

And all angles are a horizontal measurement taken from a plumb bob to a known point on the stick. Here he is showing us the eventual angle of the bow transom.

Here is a bow transom off a boat he thinks built before the War. He gave us the pattern so we could make a new one.